Cat Ears Crochet Baby Hat Pattern FREE (newborn to Toddler)
We absolutely love these cute little cat ears crochet baby hats. With cute you will want to crochet it in every color.
This is THE perfect little Halloween accessory if you’re out trick-or-treating with a small baby (sizes Newborn – toddlers)
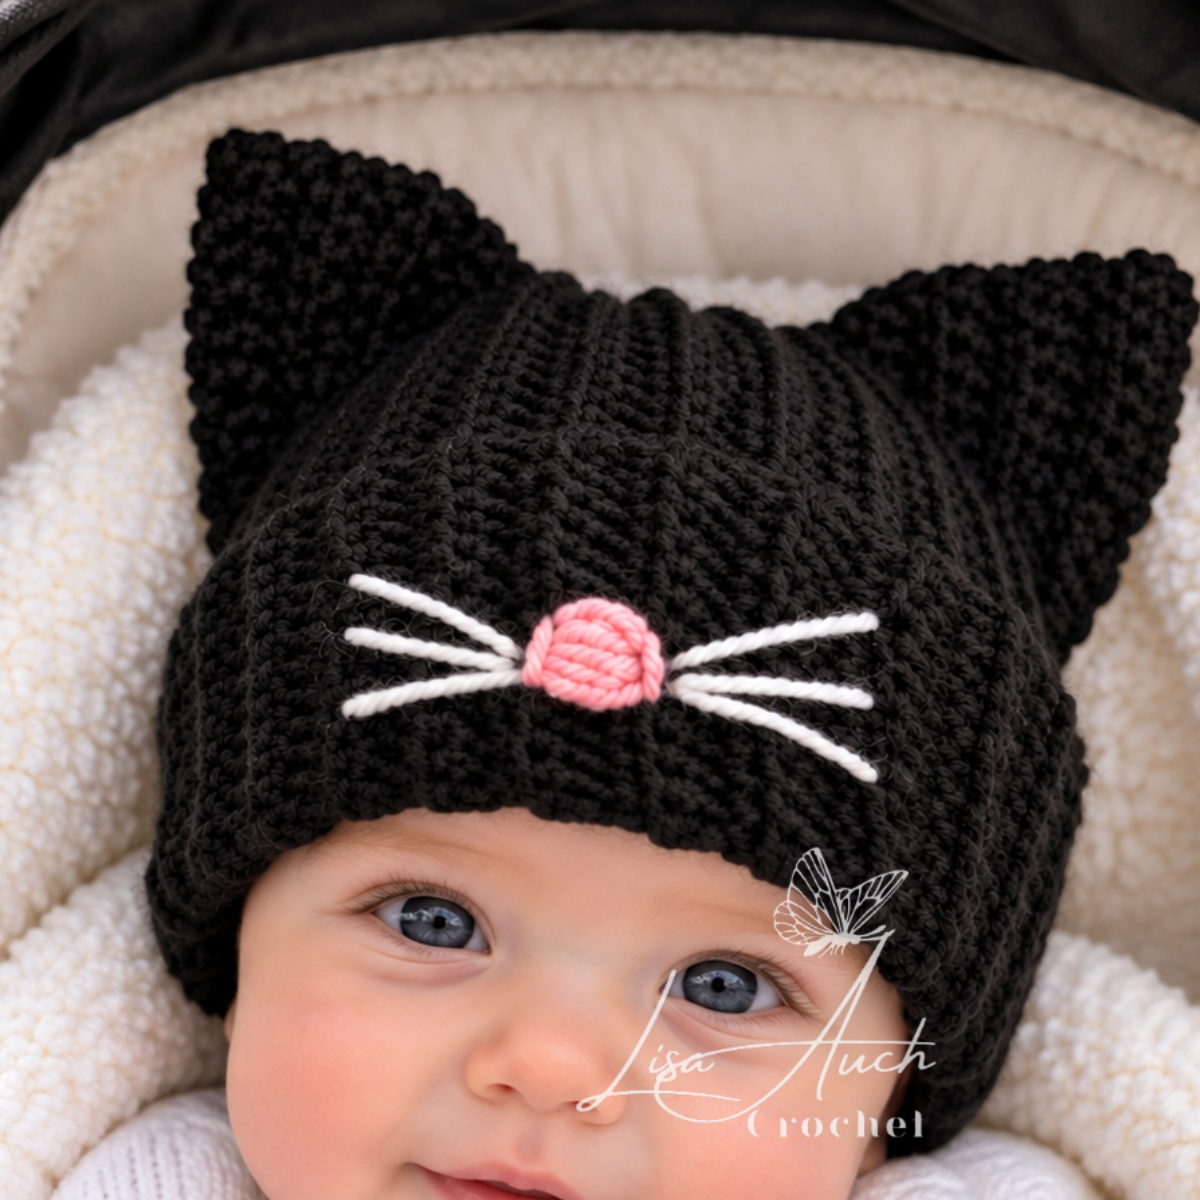
This free cat ears crochet baby hat pattern is perfect for beginners, with sizes from newborn to toddler.
Disclosure: This post may contain affiliate links. I may earn a small commission at no extra cost to you. All opinions are my own.
The hat is made from a simple crochet rectangle with no increases or decreases.
Additionally, adorable cat ears, Cat Ears Crochet Baby Hat Pattern FREE, are formed by sewing diagonally across the top corners.
I’ve also added a cosy folded brim with an embroidered pink nose and whiskers to create the cutest little cat face!
Made using DK yarn and a 4.00 mm crochet hook, these easy crochet cat hats are perfect for using up leftover yarn, making handmade baby gifts and creating matching hats for siblings.
Cat Ears Crochet Baby Hat Pattern at a Glance
- Skill Level: Easy – beginner-friendly
- Sizes: Newborn to Toddler (1–3 years)
- Yarn: DK (double knit / light weight 3)
- Crochet Hook: 4.00 mm (G/6), or a hook suitable for your chosen yarn
- Crochet Terms: US terminology
- Main Stitch: Back loop single crochet (bl-sc)
- Construction: A simple crochet rectangle, joined and sewn diagonally at the top corners to create the cat ears
- Brim: Folded turn-up brim with an optional embroidered cat face
- Sizing: Follow the baby hat size chart for the correct measurements
- Perfect For: Baby gifts, matching sibling hats and stash-busting crochet projects
Can I Use Different Yarn and Hook Sizes?
Absolutely! One of my favorite things about this easy crochet cat hat pattern is that you can use almost any yarn you already have in your stash.
I made mine using DK yarn and a 4.00 mm crochet hook, but you can use thicker yarn with a larger hook or finer yarn with a smaller hook.
- The trick is to follow my baby hat size chart and measure your crochet rectangle as you work.
- Adjust your starting chain to achieve the correct hat height, including the extra length for the folded brim, and work enough rows to reach the required finished hat circumference.
Lisa’s Tip: Different yarn weights and crochet stitches can affect the size and stretch of your hat, so always check your measurements before sewing it together.
These cute little crochet kitty hats are brilliant stash-busting projects, especially when you have small amounts of leftover yarn in different colors!
Crochet Baby Hat Size Chart (With Folded Brim)
Use my baby crochet hat size chart to choose the correct measurements for your hat.
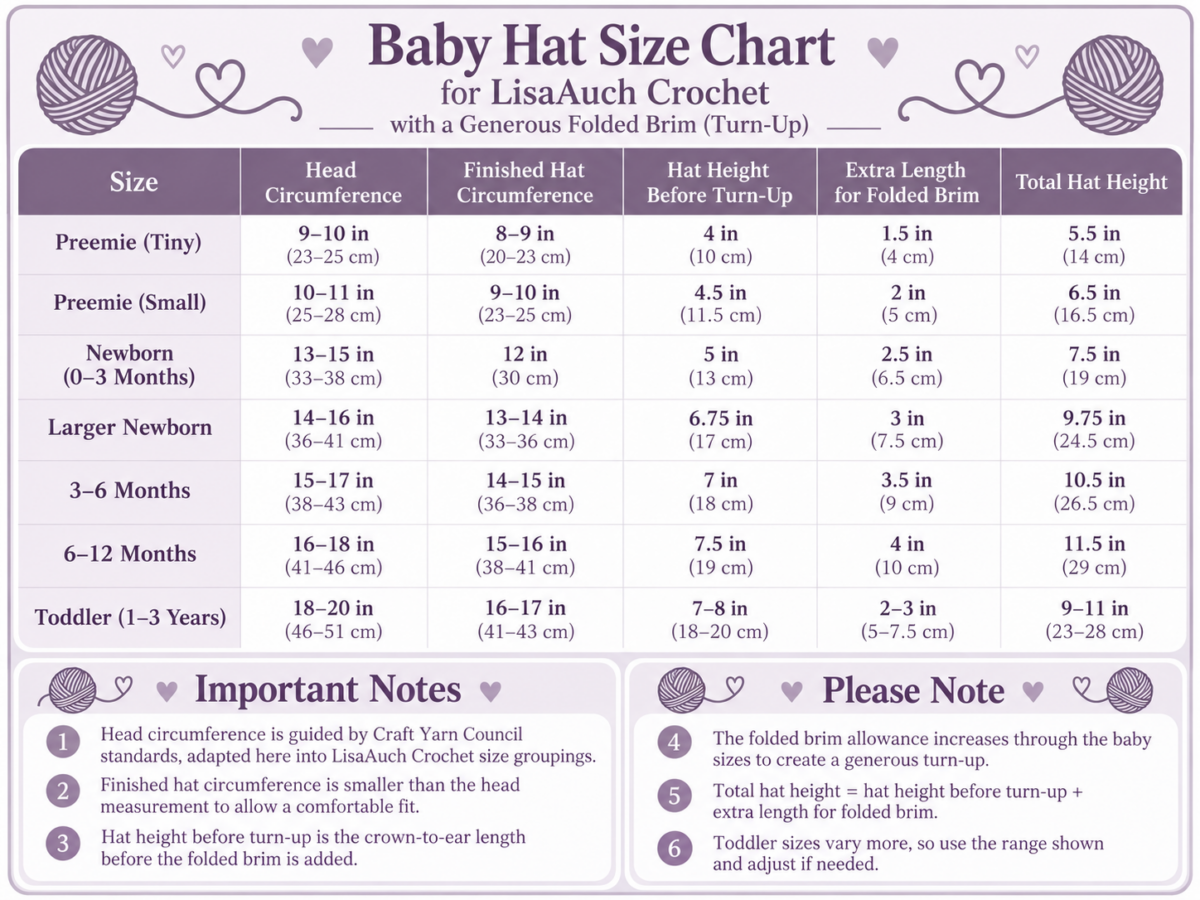
The chart includes the recommended head circumference, finished hat circumference, hat height and extra length needed for the folded turn-up brim.
Important: The starting chain should measure the total hat height, including the additional length for the brim. When the brim is folded upwards, the hat should fit comfortably down to just below the baby’s ears.
Remember that the turn-up allowance is extra fabric length. A 2-inch allowance, for example, creates approximately a 1-inch-deep folded brim.
Baby hat sizes are approximate, so always use the actual head measurement where possible, particularly when making hats for older babies and toddlers.
How to Crochet a Cat Ears Baby Hat with a Folded Brim
Here’s the clever part about this free crochet cat ears hat pattern: you don’t need to crochet the ears separately!
The whole hat starts as a basic rectangle worked in rows of back loop single crochet (bl-sc), creating a lovely ribbed texture.
Once the rectangle is joined and the top is sewn closed, two simple diagonal seams across the upper corners create the adorable pointed cat ears.
The folded brim provides the perfect finishing touch, especially when you add a little pink nose and embroidered whiskers!
How the Cat Ears Crochet Hat Is Made
- Choose your hat size. Use the baby hat size chart with the folded brim allowance to select the correct measurements, from newborn through toddler.
- Crochet your rectangle. Make your starting chain long enough for the total hat height, including the extra length for the folded brim. Work rows of back loop single crochet (bl-sc) until your rectangle reaches the required width.
- Join the rectangle. Bring the two side edges together and sew them to create the body of your hat.
- Close the top. Flatten the hat, keeping the side seam neatly positioned, and sew straight across the top edge.
- Create the cat ears. Sew diagonally across each of the two upper corners to shape the little pointed ears. Try to keep both diagonal seams the same length.
- Fold up the brim. Turn the bottom edge of the hat upwards to create the folded brim. Check that the finished hat reaches just below the ears.
- Add the cat’s face. With the brim folded upwards, mark the position of the pink nose and whiskers. Unfold the brim and embroider the little pink nose and three whiskers on either side, making sure they will appear on the outside when the brim is folded back up.
- Finish your hat. Secure and weave in all yarn ends, fold the brim back into position, and your adorable little crochet cat ears baby hat is finished!
Lisa’s Tip: I always recommend positioning the embroidered face while the brim is folded up first. This helps you get the nose and whiskers centered correctly on the finished hat.
Can I Make This Crochet Cat Hat Without the Folded Brim?
Yes! If you prefer a simple crochet cat ears baby hat without a turn-up, you can use exactly the same construction.
Simply follow the standard baby hat size chart without the additional brim allowance.
The rectangle is crocheted to the required crown-to-ear height, then joined and shaped in the same way to create the little cat ears.
You can leave the hat completely plain, or add a small embroidered face directly onto the front.
This makes the pattern easy to adapt for different styles, and the plain version may be more suitable for hospital donations, depending on the individual hospital’s requirements.
Materials You’ll Need
- Yarn: DK (double knit / light weight 3) yarn in your chosen color
- Crochet Hook: 4.00 mm (G/6), or a suitable hook for your chosen yarn
- Pink Yarn: Small amount for embroidering the cat’s nose (optional)
- Black or Dark Grey Yarn: Small amount for embroidering the whiskers (optional) and nose
- Yarn Needle: For joining the hat, shaping the cat ears and embroidering the face
- Scissors
- Tape Measure: To check the hat measurements against the baby hat size chart
- Stitch Markers: Optional, for marking the corners and positioning the cat ears
Crochet Gauge
Suggested gauge: Approximately 18–20 single crochet stitches and 20–24 rows = 4 inches (10 cm), using DK yarn and a 4.00 mm crochet hook.
This is a general starting estimate. Your actual gauge may vary because this hat is worked in back loop single crochet (bl-sc), which creates a stretchy ribbed fabric.
For this pattern, achieving the correct measurements is more important than matching a fixed stitch count.
- Starting chain: Determines the total hat height, including the extra length for the folded brim.
- Number of rows: Determines the finished hat circumference.
Measure your crochet rectangle as you work and compare it with the baby hat size chart before joining the edges.
Lisa’s Tip: Measure the width of your ribbed fabric while it is relaxed, without stretching it. The finished hat should have enough stretch to fit comfortably without feeling too tight.
Crochet Stitches and Abbreviations (US Terms)
- ch – Chain
- sc – Single crochet
- bl-sc – Back loop single crochet: work a single crochet into the back loop only of each stitch to create the ribbed texture
- sl st – Slip stitch
- st / sts – Stitch / stitches
- rep – Repeat
- RS – Right side
- WS – Wrong side
- FO – Fasten off
Pattern Notes
- This crochet pattern is written in US crochet terminology.
- The hat is made from one simple rectangle, worked back and forth in rows.
- Work into the back loops only to create the stretchy ribbed texture.
- The starting chain determines the height of the hat, while the number of rows determines its circumference.
- Add the extra length for the folded turn-up brim when measuring your starting chain.
- The cat ears are formed by sewing diagonally across the two upper corners after joining the hat.
- The embroidered pink nose and whiskers are optional. Use secure, flat embroidery rather than buttons or beads on baby hats.
- Always check the finished measurements before sewing the rectangle together.
Free Cat Ears Crochet Baby Hat Pattern (Newborn to Toddler)
This easy crochet cat hat is made from one simple rectangle using back loop single crochet (bl-sc). You can make it with a folded turn-up brim or leave the brim unfolded for a simpler finish.
- Yarn: DK (double knit)
- Hook: 4.00 mm (G/6)
- Crochet Terms: US
Before You Begin
- Choose your hat size using the baby hat size chart.
- For the folded brim version, use the total hat height measurement, including the extra length for the turn-up.
- For the plain version without a turn-up, use the hat height measurement without the additional brim allowance.
- The starting chain determines the height of your hat, and the number of rows determines the finished circumference.
Crochet the Cat Ears Baby Hat Pattern
Foundation Chain – Choose Your Size
Using DK yarn and a 4.00 mm crochet hook:
- Tiny Preemie: Ch 23 (22 sc)
- Small Preemie: Ch 27 (26 sc)
- Newborn : Ch 31 (30 sc)
- (0–3 Months) Larger Newborn: Ch 40 (39 sc)
- 3–6 Months: Ch 43 (42 sc)
- 6–12 Months: Ch 47 (46 sc)
- Toddler (1–3 Years): Ch 37–45 (36–44 sc)
Row 1: Sc in the 2nd ch from the hook and in each remaining ch across. Ch 1, turn.
Row 2: Working in the back loops only, bl-sc in each st across. Ch 1, turn.
Row 3: Bl-sc in each st across. Ch 1, turn.
Repeat Row 3 Until Your Rectangle Measures:
Using DK yarn and a 4.00 mm crochet hook:
- Tiny Preemie: 36–41 rows (8–9 inches wide)
- Small Preemie: 41–45 rows (9–10 inches wide)
- Newborn : 54 rows (12 inches wide)
- 0–3 Months Larger Newborn: 59–63 rows (13–14 inches wide)
- 3–6 Months: 63–68 rows (14–15 inches wide)
- 6–12 Months: 68–72 rows (15–16 inches wide)
- Toddler (1–3 Years): 72–77 rows (16–17 inches wide)
Important: These row counts include Row 1 and Row 2.
- Measure your rectangle without stretching the ribbing. Stop when the width matches the measurements for your chosen size.
- The starting chain determines the hat height, including the folded brim, while the number of rows determines the hat circumference.
- Once your rectangle reaches the correct width, you’re ready to join the two side edges and shape the cat ears.
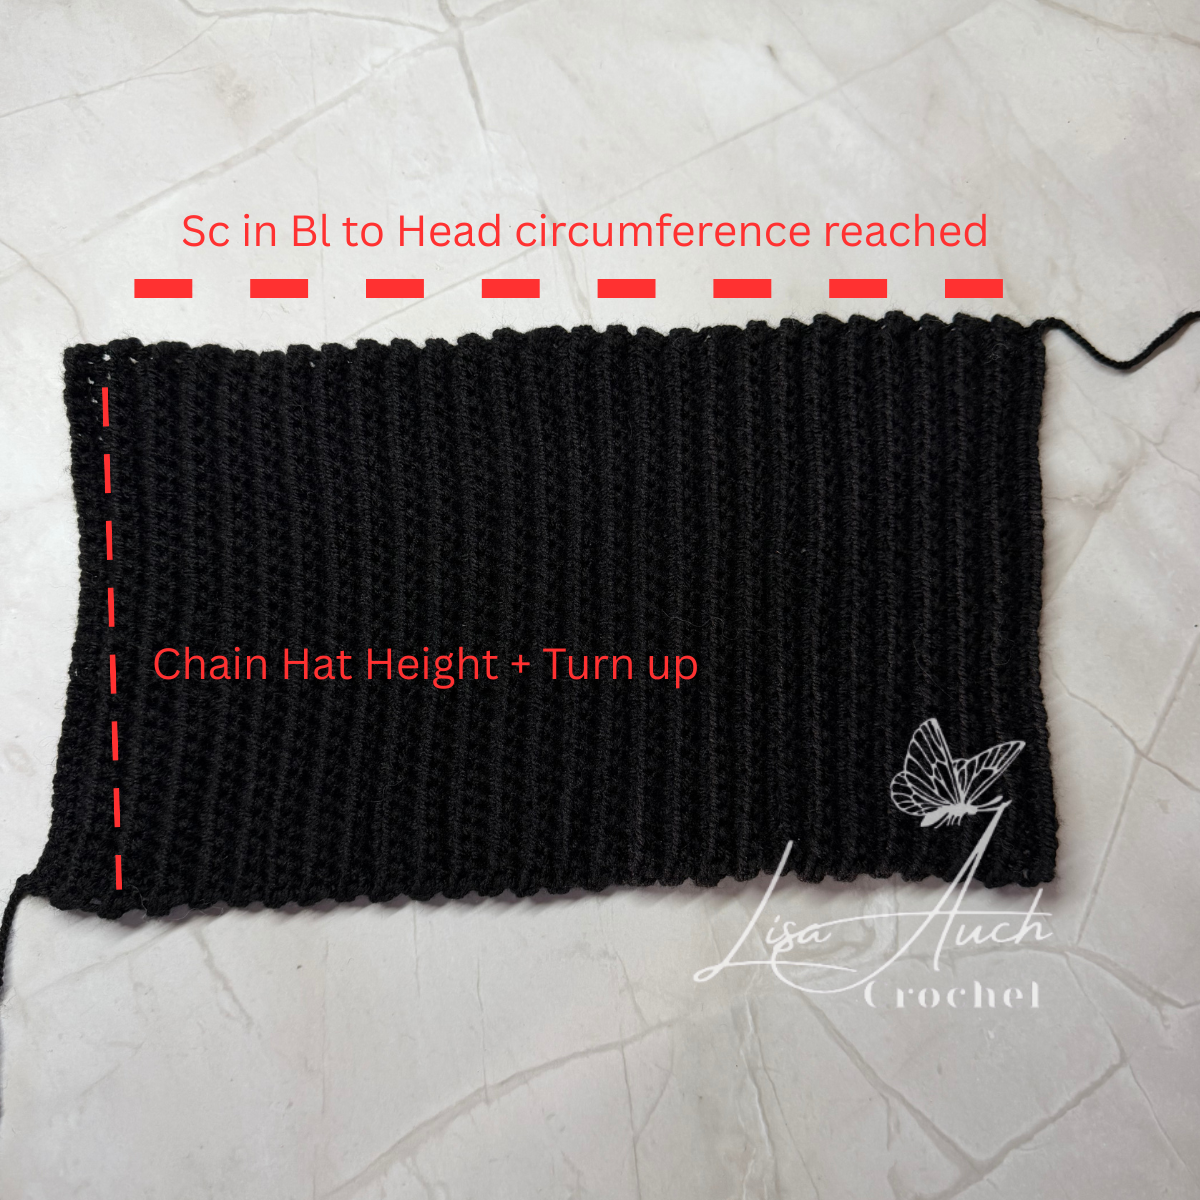
Joining the Crochet Rectangle
- Fold the rectangle so that the first and last rows meet, keeping the ribbing running vertically.
- Join the two edges together using slip stitches or sew them with your yarn needle to create a tube.
- Fasten off, leaving a long yarn tail for sewing the top of the hat.
Close the Top of the Hat
- Lay your hat flat with the side seam positioned neatly.
- Using your yarn needle, sew straight across the top edge to close the hat.
- Secure your yarn.
How to Make the Crochet Cat Ears
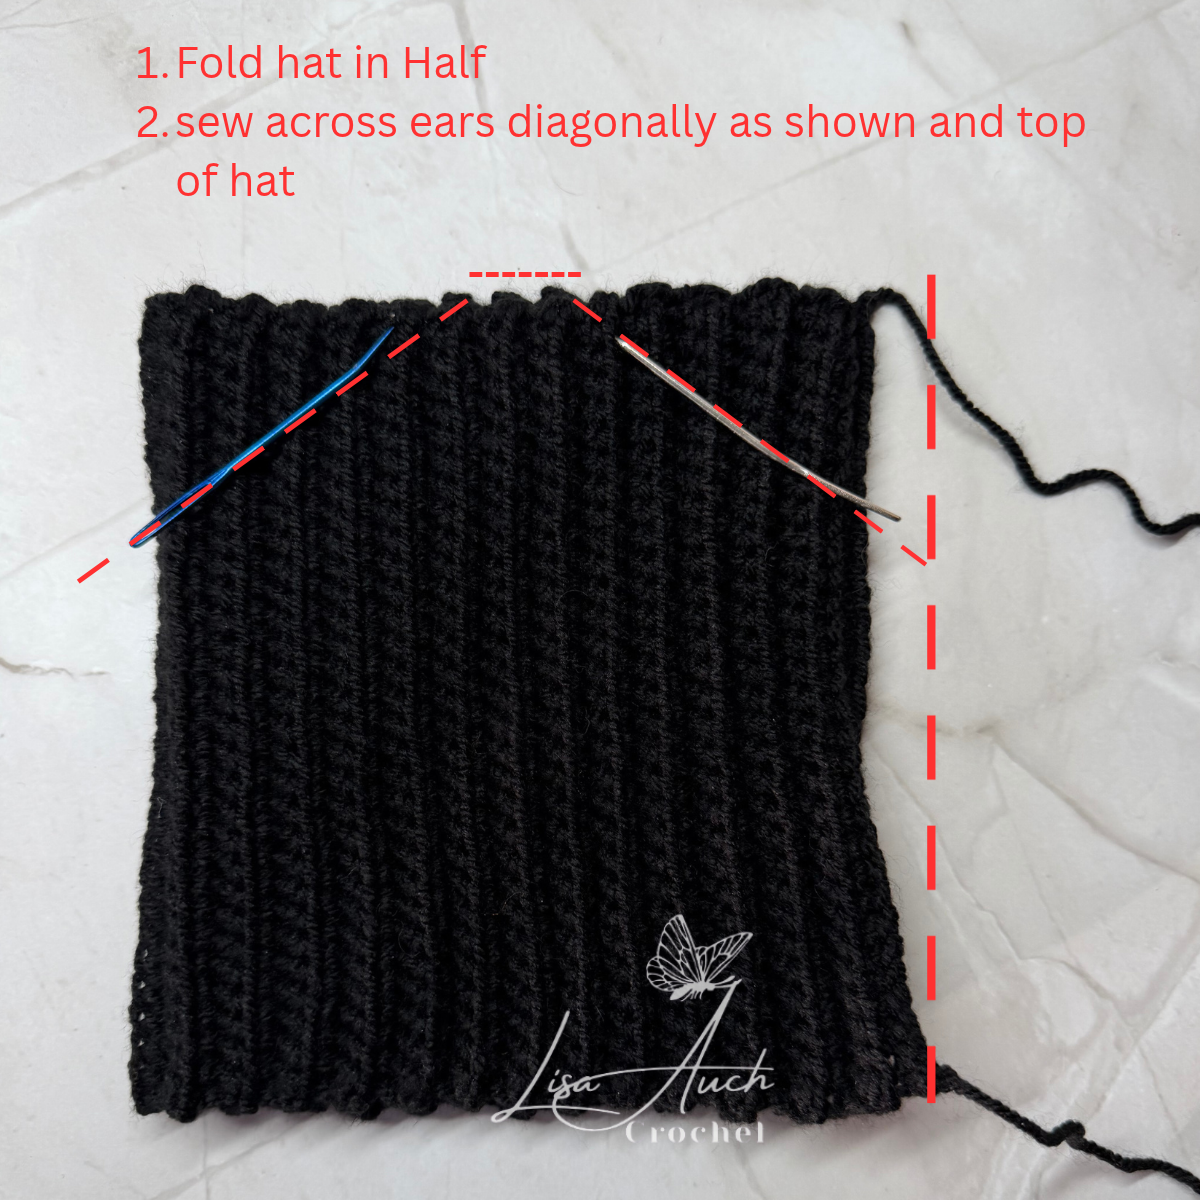
The cute little cat ears are formed by sewing diagonally across the two top corners of the hat.
- Lay the hat flat with the top seam running horizontally.
- Measure and mark an equal distance down and across from each top corner.
- Sew a diagonal line between the two marked points at each corner, creating a triangular ear shape.
- Repeat on the opposite corner, making sure both ears are the same size.
- Secure the yarn ends neatly inside the hat.
Your little crochet cat ears are now formed without crocheting or attaching any separate pieces!
Make the Folded Brim
Fold the lower edge of the hat upwards to create your cosy turn-up brim.
Adjust the fold so the finished hat sits comfortably just below the ears.
Add the Cat’s Nose and Whiskers (Optional)
- With the brim folded upwards, mark the center front where you want the cat’s face to sit.
- Unfold the brim and use your yarn needle to embroider a small pink triangle for the nose.
- Add three little whiskers on either side using black or dark gray yarn.
- Fold the brim back upwards to reveal the finished cat face.
Lisa’s Tip: For baby hats, embroider the facial details securely using yarn rather than attaching buttons, beads or other small decorations.
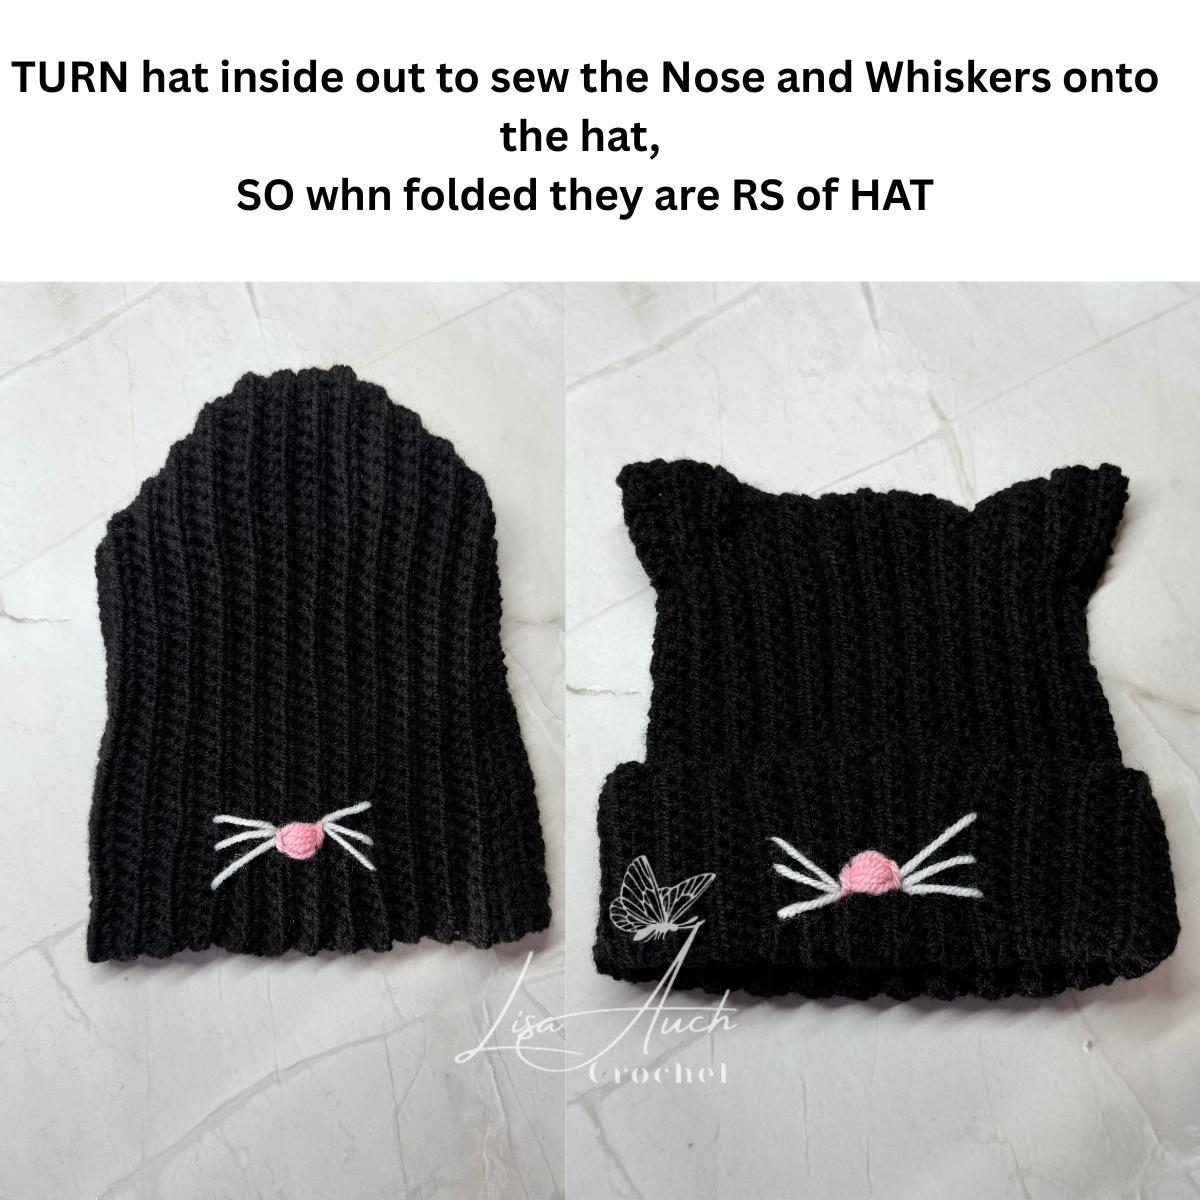
Finishing your little Cat ear baby hat
Weave in all remaining yarn ends and check that the seams and embroidery are secure.
Fold the brim into position and gently shape both cat ears.
Your adorable crochet cat ears baby hat is finished!
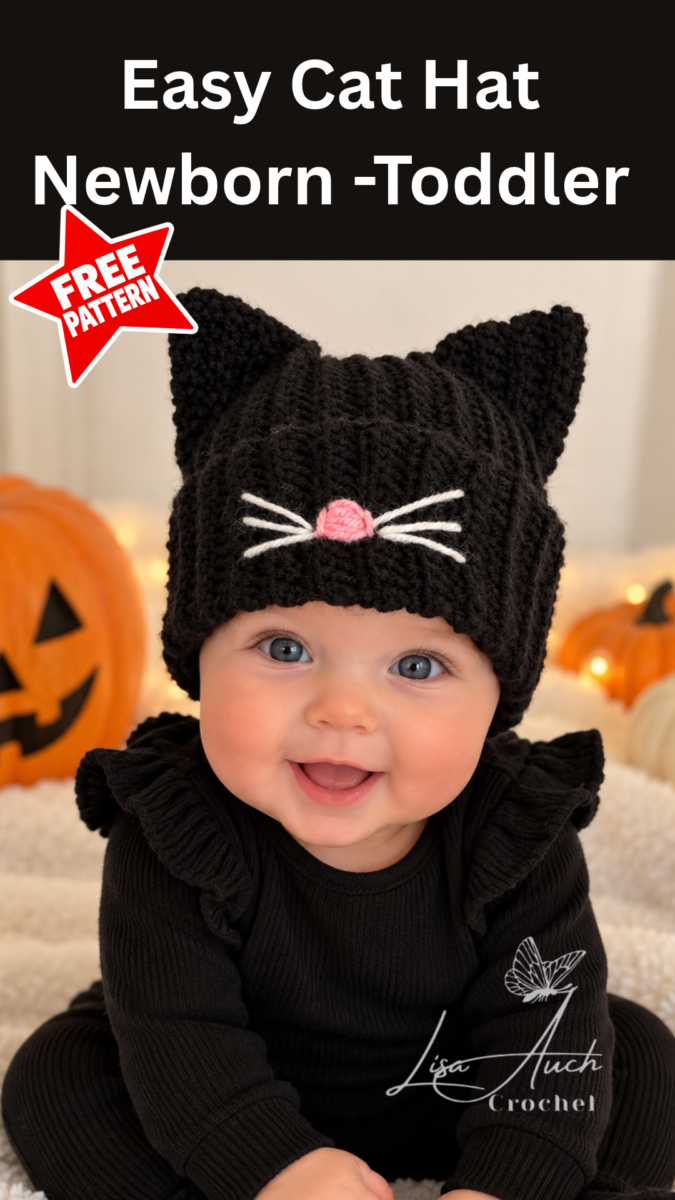

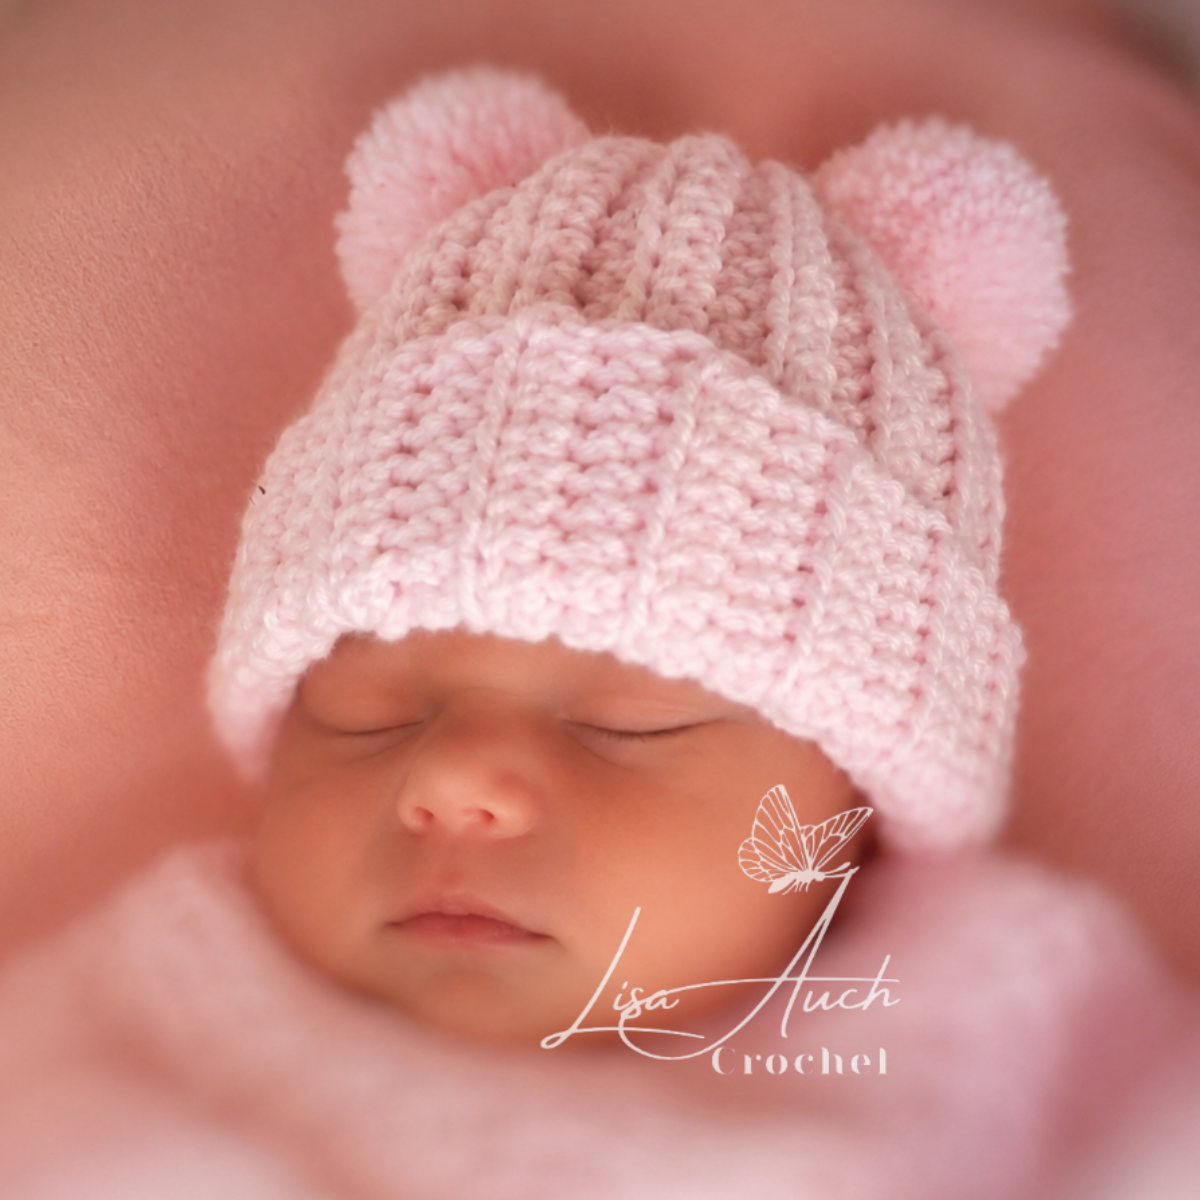
This little crochet pumpkin hat is super easy to crochet too in all sizes

Pumpkin Crochet Baby Booties! super simple to crochet too! made in one piece


You may make and sell finished items made from this pattern. Please credit LisaAuchCrochet as the original designer.
You may not copy, rewrite, reproduce, redistribute, republish, or upload this pattern, in whole or in part, in any format, including as text, PDF, AI-generated or AI-rewritten content, within an app, or as a video tutorial.
You may not use Reader Mode, Print View, Save as PDF, screenshots, content-extraction tools, or any other method to bypass or remove advertising from this website and then upload, import, reproduce, or make the pattern available through another app, website, platform, or service.
All LisaAuch Crochet photographs and images are copyrighted. You may not copy, download, crop, edit, alter, republish, or use these images except as expressly permitted by the LisaAuch Crochet Pattern Use & Copyright Policy.
Factory production and mass manufacturing of items made from this pattern are not permitted.
For full details, please see:
Happy Crocheting! © All Rights Reserved LisaAuchCrochet